


How to Complete Rubi Network KYC Verification in 2026
How to Complete Rubi Network KYC Verification in 2026: A Step-by-Step Guide
Introduction:
The Rubi Network is gaining popularity in the crypto mining community. To secure your earned Rubi tokens and enable withdrawals, completing the Know Your Customer (KYC) process is mandatory. In this guide, we will walk you through the entire Rubi KYC verification process and show you how to migrate your coins to your wallet.
1. Eligibility Criteria for Rubi KYC
Before applying for KYC, ensure you meet the following requirements:
- Account Age: Your account must be at least 30 days old.
- Mining Activity: You should have mined for at least 30 days and own a minimum of 30 Rubi coins.
- Profile Update: Your "My Information" section must have been updated for at least 30 days.
To process your KYC faster, you need to pay a small fee in RBL coins (typically 2 RBL).
- Open your Rubi wallet and click on 'Receive'.
- Copy your address and acquire at least 2 RBL coins (through the community or P2P).
- Ensure you have set a 4-digit PIN in the wallet settings, as it is required for all transactions.
3. The Step-by-Step KYC Process
Once you are eligible and have the RBL coins, follow these steps:
- Navigate to Verification: Go to the app menu and select 'User Verification', then click on 'e-KYC'.
- Agree to Terms: Click 'Continue' and 'Agree' to the terms.
- Payment: Select the '2 RBL' option for faster verification. Click 'Check Out' and then 'Transfer'. Enter your wallet PIN to confirm the payment.
- Confirm Payment: After the transfer, click on 'Already Paid' and then 'KYC Now'.
-
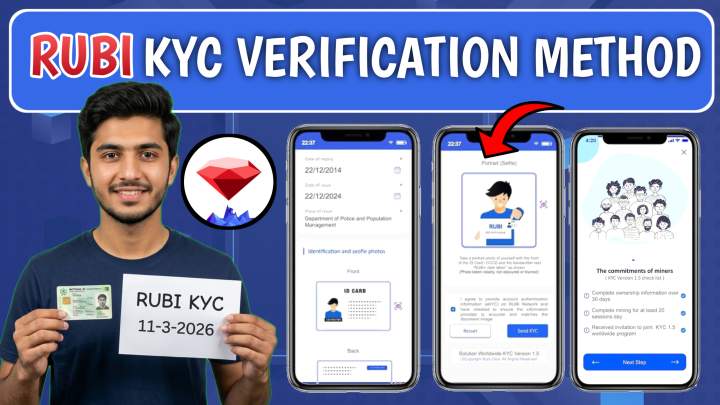
Personal Details: Select 'National ID Card' and fill in the following:
- ID Number (without dashes).
- Full Name, Date of Birth, and Gender.
- Nationality and Place of Residence (e.g., Pakistan, India, etc.).
- ID Expiry and Issue Dates.
- Document Upload: * Front & Back: Upload clear photos of the front and back of your ID card. Ensure all four corners are visible.
- Holding Photo (Verification Selfie): Hold your ID card in one hand and a piece of paper in the other. On the paper, write "Rubi KYC" followed by the current date (e.g., 06/09/2024). Upload this photo.
- Submit: Click 'Submit'. Verification usually takes about 24 hours.
4. How to Migrate Coins to Your Wallet
After your KYC is approved, you must manually migrate your mined coins to your wallet:
- Go to the 'Statistics' icon at the bottom of the app.
- Select 'User Verified' and then click on 'Migration'.
- Check the available balance and click 'Apply'. Your coins will be moved to your wallet, and you will receive a notification.
Conclusion:
Completing your Rubi KYC is the first step toward cashing out your hard-earned tokens. Make sure your photos are clear and your details match your ID card to avoid rejection. Once migrated, hold your coins for the upcoming exchange listing to get the best price!
Keywords: Rubi Network KYC, Rubi Token Migration, RBL Coins, Crypto Mining 2024, Rubi Wallet Setup.
Rubi Network KYC Verification Kaise Karein? (Mukammal Guide 2026).
Rubi Network par mining karne wale doston ke liye KYC complete karna bohot zaroori hai. Jab tak aap ki KYC nahi hogi, aap apne mined coins ko wallet mein transfer ya sell nahi kar sakenge. Aaj ki is post mein hum aapko step-by-step batayenge ke Rubi KYC ka sahi tarika kya hai.
1. KYC ke Liye Zaroori Requirements
KYC apply karne se pehle ye check kar lein ke kya aap in cheezon par poora utartay hain:
- Account Age: Aapka account kam az kam 30 din purana hona chahiye.
- Mining Power: Aapne lagatar 30 din mining ki ho aur aapke paas kam az kam 30 Rubi coins hon.
- Profile Update: "My Information" walay section mein apni details update kiye hue 30 din guzar chuke hon.
2. RBL Coins aur Wallet PIN
KYC ki fees pay karne ke liye aapko 2 RBL (Rubi Lens) coins chahiye honge.
- Apne wallet mein jayein, 'Receive' par click karke address copy karein aur 2 RBL mangwa lein.
- Wallet ki setting mein ja kar 4-digit PIN lazmi set karein, kyunke har transaction ke waqt ye code manga jayega.
3. KYC Apply Karne ka Tarika (Step-by-Step)
Jab aapke paas RBL coins aa jayein, to ye steps follow karein:
- Menu Open Karein: App mein "User Verification" par jayein aur e-KYC par click karein.
- Fees Pay Karein: "2 RBL" wala option select karein (is se verification jaldi hoti hai). Check out par click karke apna PIN dalein aur fees transfer kar dein.
- Payment Confirm Karein: Fees bhenjne ke baad 'Already Paid' par click karein aur phir 'KYC Now' ka button dabayein.
- Details Fill Karein: Ab apna sahi naam, ID card number (baghair dash ke), Date of Birth aur apni Country (Pakistan/India) select karein.
-
Documents Upload Karein:
- Apne original ID card ki Front aur Back ki saaf photo upload karein.
- Holding Photo (Selfie): Ek saaf kaghaz par "Rubi KYC" aur us din ki Date likhein. Ek hath mein ID card aur dusre mein wo kaghaz pakar kar selfie lein aur upload karein.
- Submit: Sab kuch check karke submit kar dein. Taqreeban 24 ghanton mein aapki KYC approve ho jayegi.
4. Coins ko Wallet Mein Kaise Bheinjein? (Migration)
KYC approve hone ke baad coins ko wallet mein lana zaroori hai:
- App mein Statistics (graph wala icon) par jayein.
- User Verified par click karein aur phir Migration select karein.
- Jitne coins available hain unhein select karke Apply kar dein. Aapke coins foran wallet mein aa jayenge.
Mashwara:
KYC ke liye hamesha saaf photos istemal karein taake reject na ho. Jab coins wallet mein aa jayein to unhein hold karein taake listing ke waqt aapko achi qeemat mil sakay